S'More Cheesecake - Just in time for Thanksgiving!
- Admin

- Nov 21, 2017
- 4 min read
Here we are! Just in time for Thanksgiving, first off welcome to the site! Check out my other recipes and if you are looking for a place to get a meal, check out the restaurant reviews!
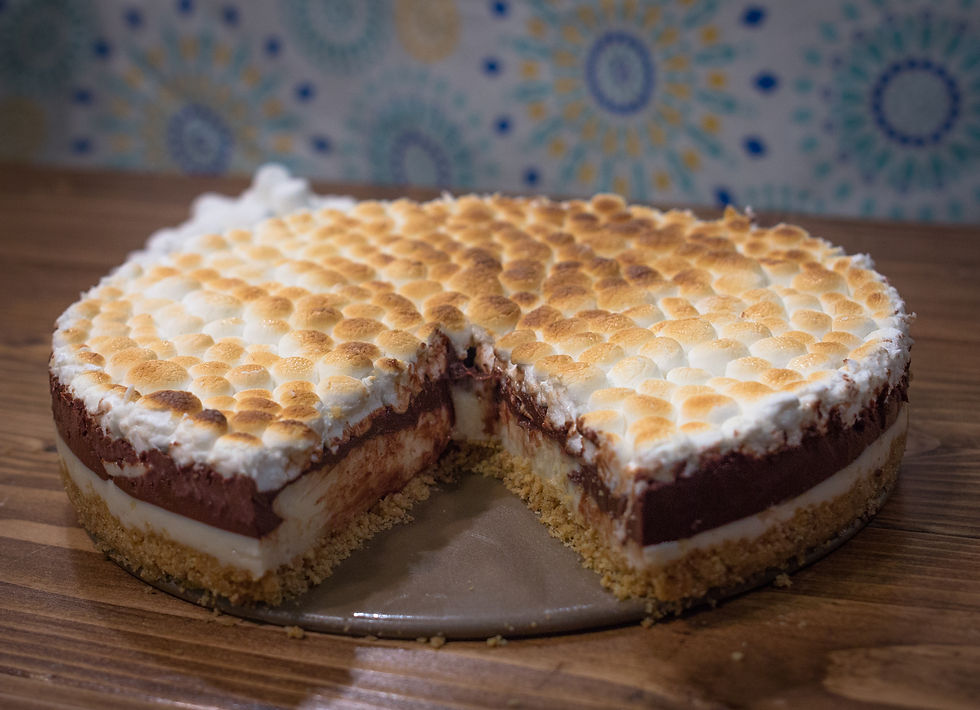
Today we have a perfect, rich dessert to round out your thanksgiving meal this year. The S’More cheesecake has an extremely rich flavor of marshmallows and cream cheese topped with a layer of decadent chocolate ganache. Best of all, it requires no baking at all, and the only tools you really need for this is a microwave, a spring-form pan, and a bowl. I even reused the same bowl for the whole process just giving it a quick wash in between steps. So here is what you need for ingredients.
Ingredients:
Base:
1 Sleeve of Graham Crackers
3 tbsp Butter
Filling:
⅔ Pack of Mini Marshmallows
8 oz Cream Cheese
1 tbsp Vanilla Extract
¾ cup Powdered Sugar
Ganache:
1 Cup Heavy Whipping Cream
8 oz Chocolate Chips
1 tsbp Butter
Okay, so the ingredients list can look intimidating, it’s a little long. The thing is, I had most of this stuff already and I bet you will too. I had to go buy a few things but it wasn’t crazy. Plus if the ingredients start to make start to stress you out just skip straight to the first step. Throw your graham crackers in a zip-lock bag and beat them up like you’re Rocky Balboa in the heavyweight title match of your life against Apollo Creed. I used a rolling pin to roll them into oblivion...I love making food. You may have to stop and squeeze the air out of the bag during the process if you can’t get it all out to start.

Once the graham crackers look like they’ve gone through a wood chipper, you’re ready to roll. Throw them into a bowl and add your butter that you melted in the microwave beforehand.
Pro tip: You were supposed to melt the butter in the microwave but I didn’t say anything earlier. Hopefully you read my mind.
Now take a fork a mix the butter into the graham cracker dust. This will add some richness to the mixture and also help your base to stay together a little better. You may need to add a little more butter, that’s up to you. Just get it so it’s not soaking wet, but it will stick together a bit if you squeeze it in your hand. Once you have a consistency you like, add your base layer to your oiled spring form pan and pat it down with your hand to level it out.

Now we are ready to make the marshmallow filling. Grab a large bowl and toss in your marshmallows and pop that suck in the microwave. Oh yeah, make sure the bowl is microwavable so we don’t have an incident. I did mine for about two minutes but every microwave is vastly different. Which we all know because somehow we always manage to burn the popcorn when you are using a friend’s microwave. You could put it in for 5 seconds at a time and you would still be greeted with a steamy pile of ashes when you open the bag. That’s just microwave law. So you do you when it comes to the microwave, just melt the marshmallows into a sticky paste and mix them up. Then soften your cream cheese in the microwave and add it to the party. At this point you can add the powdered sugar and vanilla extract and whip the mixture together. Once it is mixed up you are ready to add it to the base layer. Layer it on top of the graham cracker base and give it a little shake to settle it. Then put the cheesecake into the freezer to set. I would say give it about 15-20 minutes at least before adding the ganache. This will also allow time for your ganache to cool after you make it.

Time to smash the ganache. Dang it! I wish French people didn’t pronounce things so weird. That rhyme would have been great. Okay, so clean out your bowl or grab another one. Add the cream and microwave it for a minute or two. Remove it from the microwave and add your chocolate chips. Make sure the chocolate is coated completely by the hot cream, this is how we are going to melt the chocolate. Let it sit for a minute of two to soften and then grab a whisk and start mixing. Start in the middle and work to the edge as it changes texture. Once all the chocolate is melted and combined, toss a little slab of butter. The butter adds a little richness and will help the ganache to maintain its shine. Once that is melted and mixed in, your ganache is done. As it cools it will thicken. Let it cool to close to room temperature before adding it onto the cheesecake so you don’t risk melting the cheesecake that has already set. Once you have it layered on and smoothed out, throw it back in the freezer. This time I would go a little longer, I did about an hour before adding the finishing touches.

After your ganache has set it’s time to add the marshmallow topping. You could melt more marshmallows and add them in top at this point but I am a patient man because I chose to add the mini marshmallows whole to the top. I did this for appearance mainly, so it’s up to you which way you want to go with the top layer. Once you finish adding the top layer, if you don’t have a torch to toast the marshmallow on top, do what I did and start the broiler on high and place the cheesecake under the broiler. Leave the oven door open and stay attentive because it only takes a minute or two to get the color on the marshmallows and create the look and texture we are after.
And there you have it. Put the cheesecake back in the freezer to set fully after being exposed to the heat. Or put it in the fridge if you made it a day in advance. There you have it, a bonfire classic brought to the Thanksgiving table.
Enjoy!


Comments